
Before, GKE made you choose between Standard and Autopilot when creating a cluster. Standard meant you manage node pools, machine types, and autoscaling yourself. Autopilot meant GKE manages all of that, but you give up things like DaemonSets and SSH access.
Now there’s a middle option. You can use Autopilot ComputeClasses inside a Standard cluster. Add a nodeSelector to a pod, GKE creates and manages a node for it. The rest of your pods still run on your normal node pools. Full article: Run workloads in Autopilot mode in Standard clusters.
I tried this to see how it works in practice. A few things are worth knowing.
You select a ComputeClass using a nodeSelector in your pod spec:
spec:
  nodeSelector:
    cloud.google.com/compute-class: autopilot
GKE sees this, creates a node, schedules the pod there, and removes the node when nothing needs it. You don’t create node pools or set up autoscaling for this.
Pods without a ComputeClass selector run on your existing Standard nodes as usual. The available options:
gcloud services enable container.googleapis.com
export PROJECT_ID=$(gcloud config get-value project)
export CLUSTER_NAME=lab-autopilot-standard
export ZONE=us-central1-a

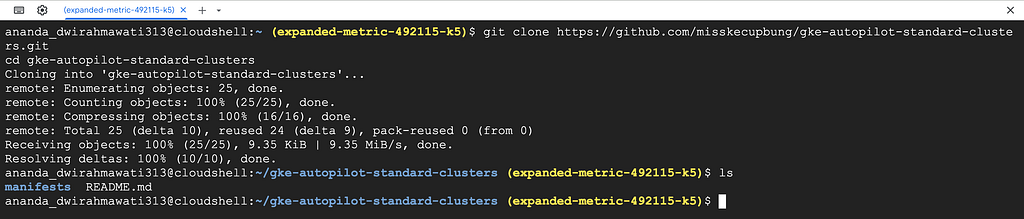
git clone https://github.com/misskecupbung/gke-autopilot-standard-clusters.git
cd gke-autopilot-standard-clusters
This needs a Standard cluster on the rapid channel with GKE version 1.34.1 or higher. That’s the minimum version for Autopilot ComputeClasses on Standard.
gcloud container clusters create $CLUSTER_NAME \
  --zone $ZONE \
  --num-nodes 1 \
  --machine-type e2-medium \
  --release-channel rapid \
  --enable-autoprovisioning \
  --max-cpu 20 \
  --max-memory 64
— enable-autoprovisioning lets GKE create node pools on its own when a ComputeClass needs them. Without this, ComputeClass pods would stay Pending.

Once the cluster is ready, get credentials and check the node:
gcloud container clusters get-credentials $CLUSTER_NAME --zone $ZONE
kubectl get nodes

You should see 1 node in Ready state.
Also check that the built-in ComputeClasses are available:
kubectl get computeclasses

You should see autopilot and autopilot-spot listed.
Go to Kubernetes Engine → Clusters in the console. You should see lab-autopilot-standard running on the Rapid channel and Autopilot compute class compatibility is Enabled


The only difference from a normal deployment is the nodeSelector. No node pool to create, no autoscaling to configure. GKE handles the node:
apiVersion: apps/v1
kind: Deployment
metadata:
  name: workload-autopilot
spec:
  replicas: 1
  selector:
    matchLabels:
      app: workload-autopilot
  template:
    metadata:
      labels:
        app: workload-autopilot
    spec:
      nodeSelector:
        cloud.google.com/compute-class: autopilot
      containers:
      - name: app
        image: nginx:stable
        resources:
          requests:
            cpu: "250m"
            memory: "512Mi"
          limits:
            cpu: "250m"
            memory: "512Mi"
Apply it and watch the pod status:
kubectl apply -f manifests/workload-autopilot.yaml
kubectl get pods -w

The pod stays Pending for 1–3 minutes while GKE creates a node. Then it goes Running.
Check the nodes:
kubectl get nodes -L cloud.google.com/compute-class

Two nodes now — your original e2-medium and a new one GKE created for the autopilot pod.
When you delete the pods, GKE removes the node automatically. There’s nothing to clean up manually.
kubectl delete -f manifests/workload-autopilot.yaml
kubectl get nodes -L cloud.google.com/compute-class -w

Same as Step 2, but the node is a Spot VM. Spot VMs are cheaper but can be stopped by GCP at any time. Good for batch jobs or workloads that can restart.
kubectl apply -f manifests/workload-autopilot-spot.yaml
kubectl get pods -w

Once running, check the nodes:
kubectl get nodes -L cloud.google.com/compute-class,cloud.google.com/gke-spot

You should see an autopilot-spot node with cloud.google.com/gke-spot=true.
See which pod is on which node:
kubectl get pods -o wide

Verify the workloads from Console

The built-in classes work for general use. If you need a specific machine family, you can create your own ComputeClass. This one targets N4 machines — it tries Spot first, then falls back to on-demand if no Spot capacity is available.
Here’s manifests/computeclass-n4.yaml:
apiVersion: cloud.google.com/v1
kind: ComputeClass
metadata:
  name: n4-class
spec:
  autopilot:
    enabled: true
  priorities:
  - machineFamily: n4
    spot: true
  - machineFamily: n4
    spot: false
  activeMigration:
    optimizeRulePriority: true
  nodePoolAutoCreation:
    enabled: true
This tells GKE: try N4 Spot first, fall back to N4 on-demand. autopilot.enabled: true means GKE manages these nodes like it manages the built-in classes. nodePoolAutoCreation means you don’t need to create the node pool yourself.
kubectl apply -f manifests/computeclass-n4.yaml
kubectl get computeclasses

Then deploy a workload that uses it:
kubectl apply -f manifests/workload-custom-class.yaml
kubectl get pods -w

GKE picks an N4 node based on the priorities in the ComputeClass. Once the pod is running, check the nodes:
kubectl get nodes -L cloud.google.com/compute-class

You should see a node with cloud.google.com/compute-class=n4-class.
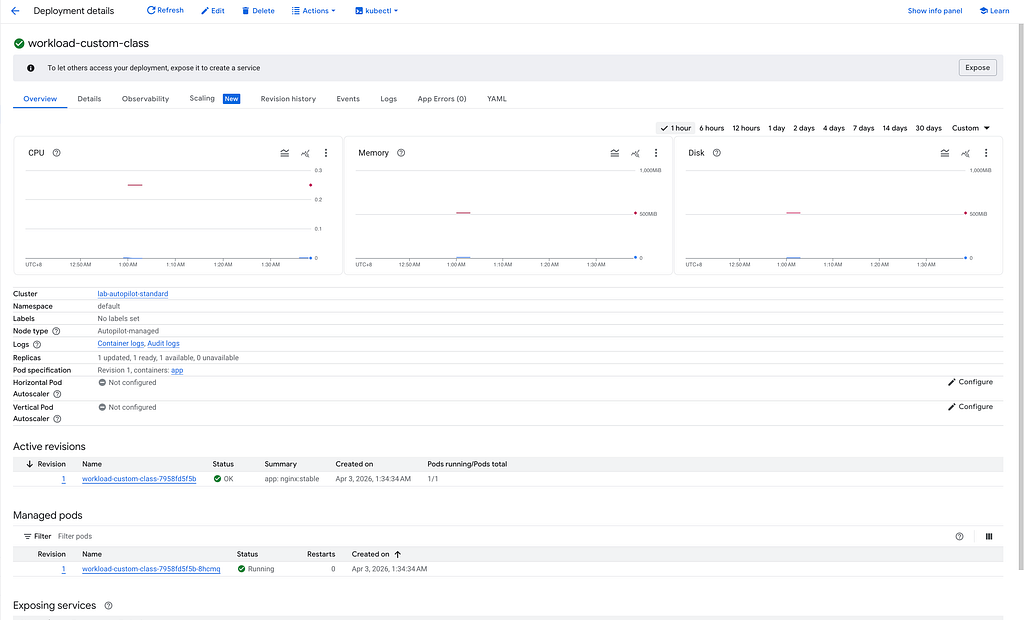
We also able to verify from Console
This was something I didn’t expect. Each ComputeClass has minimum resource requirements. If your pod requests less than the minimum, GKE changes the values before scheduling the pod. It doesn’t warn you.
Check what the pod actually got:
POD=$(kubectl get pod -l app=workload-custom-class -o jsonpath='{.items[0].metadata.name}')
kubectl get pod $POD -o jsonpath='{.spec.containers[0].resources}' | python3 -m json.tool 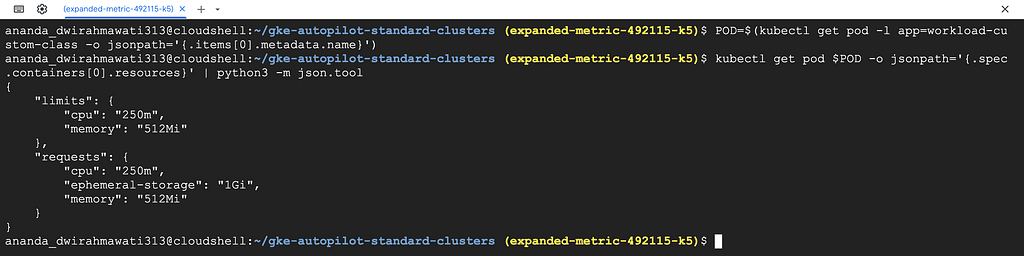
The output looks like this:
{
    "limits": {
        "cpu": "250m",
        "memory": "512Mi"
    },
    "requests": {
        "cpu": "250m",
        "ephemeral-storage": "1Gi",
        "memory": "512Mi"
    }
}
The manifest has no ephemeral-storage field — GKE added 1Gi because that’s the Autopilot node minimum. The cpu and memory were already high enough, so those stayed the same.
To confirm the two modes don’t interfere, deploy a pod without any ComputeClass selector:
kubectl apply -f manifests/workload-standard.yaml
kubectl get pods -o wide
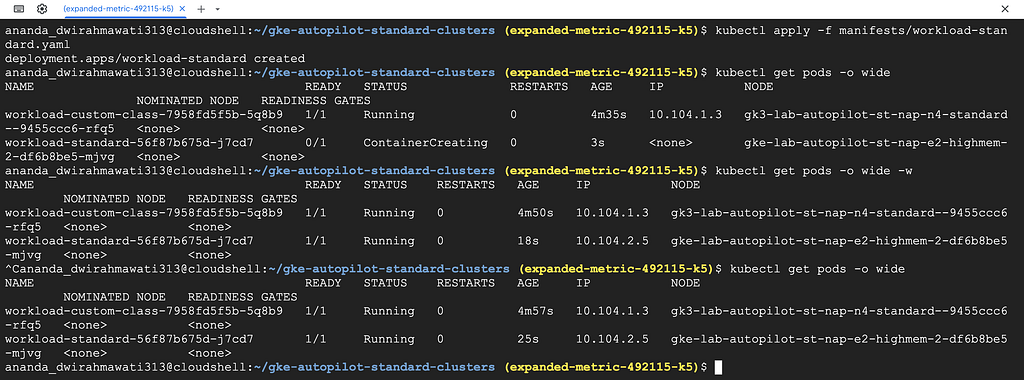
It goes to the original e2-medium node. The Autopilot-managed nodes are only used by pods that select them.

Now delete the custom class workload and watch the node go away:
kubectl delete -f manifests/workload-custom-class.yaml
kubectl get nodes -L cloud.google.com/compute-class -w

The n4-class node stays for a few minutes. GKE waits before removing it to avoid creating and deleting nodes too fast. After that, it’s gone.
You can verify in the console — go to the Nodes tab and refresh after a few minutes. The n4-class node should be gone.
kubectl delete -f manifests/
gcloud container clusters delete $CLUSTER_NAME --zone $ZONE --quiet

A good use case is a batch job that needs more CPU than your regular nodes have. Without ComputeClasses, you’d need to keep a large node pool running all day or manage autoscaling for a pool you rarely use. With autopilot-spot, you just add the selector, GKE creates a Spot node, the job runs, and the node goes away.
Custom ComputeClasses are useful when you need a specific machine family. Create one with N4 or C3 priorities, add the selector to your workload, and GKE takes care of the rest.
This doesn’t replace Standard node pools. DaemonSets only run on Standard nodes. If you need SSH access, custom kernel parameters, or hostPath volumes, you still need Standard nodes. ComputeClasses are for pods where you don’t need control over the underlying node.
The built-in autopilot and autopilot-spot classes require GKE version 1.34.1+. Custom ComputeClasses with autopilot.enabled: true have the same requirement.
<hr><p>Using Autopilot ComputeClasses on GKE Standard Clusters was originally published in Google Cloud - Community on Medium, where people are continuing the conversation by highlighting and responding to this story.</p>